Monday, November 22, 2010

We Have Walls...

...and a lot of dust!  The drywall guys were at our house for the better portion of last week, and now you can get a good feel of how the completed project is going to look.  Here's the first piece of drywall being installed...


So, after several days, here's what it looks like now.  This first picture is the new doorway in the kitchen leading into the hallway.


The next two pictures are of the bedroom.  This first picture is standing in the doorway looking through the bedroom.


This bedroom shot shows the back wall of the bedroom with doors to the bathroom (first door from the left) and closet.


Here's a picture looking into the closet.


Here's one looking into the bathroom.


And, here's one standing at the back wall of the bathroom looking towards the bedroom. The door you see is the water closet.


Typically around the holidays the construction business slows down some because people don't want their houses torn up for company.  This does two things for us - it gives Kevin more time to work on our house, and it frees up the other people we need to come help us with our house.  So, we are on a roll and plan on pushing ahead. 

This weekend we painted the whole area, and we chose a green color for the bedroom and bathroom.  It is called Georgian green, and here's a picture.  We are going to paint stripes in the bathroom to give it a little different look from the bedroom. Although, this picture doesn't really accurately portray the true color, you get the idea.


The hallway, closet and pantry are all painted Brown Bread, which is the same color we have in our living room and other hallway area.  You may notice that guy standing outside the window.  The brick masons are at the house today putting up the brick around the window that we removed when we took out the door.  Also, the hardwood floor guy is coming by today to look at our space and will hopefully install the hardwoods tomorrow and Wednesday. 

I do not have a picture of the office, but will post one soon.  The old door is patched, and it is painted.  You would have never known there used to be a door there and it makes the room look completely different.

We have also ordered our tile for the bathroom.  It should be here after Thanksgiving, and then we will move on to tiling. 

Thursday, November 11, 2010

The Progress Continues

So, I officially admit that I am the worst blogger on the face of the planet.  I just didn't take to it like I thought I would, but several people have commented on my lack of postings, so I am trying again.  We have actually done ALOT since the last time I posted.  So, you might want to get comfortable...

We installed the subfloor,took out the door, framed up the walls, completed the plumbing and the electrical, and most recently removed the outside stairwell.  Not to mention, we got our tub back after the reglazing, and it looks awesome.  We also got our buffet (turned vanity) from getting a new top, and it looks great too.  We also picked out and orderd our lights and medicine cabinents for the bathroom.  We had our inspection earlier this week and will put up drywall tomorrow!  Now, here's a few pictures of the progress...

 Here is the floor being layed.


 The expert wood cutter in action as we frame up the walls.  Thanks to my new measuring tape complete with flashlight and sticky notes, this task was super easy, and I could remember all my measurements because I could write them on the sticky notes!


There's the first wall that went up - that divides the bedroom from the bathroom and closet. (notice the door is still in this picture.  You'll see that big transformation soon.)


 Here's a look through the trees to remind you what the side of the house used to look like.  That stairwell went up into our back room and of course we didn't want a door to the outside in our bedroom, so now it has come out and turned into a window.


 Here's a look mid-renovation.  You can see the door is gone and the stairs are being demoed.


 Here's the final project.  We do still have to rebrick sections and eventually that dirt portion will be concreted to extend the driveway.


  Here's a look from the inside.  This completely transformed the look of the room - getting rid of that door and adding more light and more space since the door used to come into the room farther.  Remember what it used to look like here...


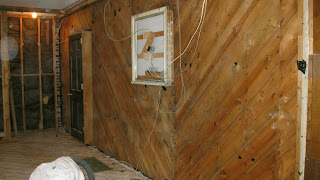
This is a different shot of the wall that divides the bedroom from the bathroom and closet  The first big opening is the door to the bathroom and the second opening (by the trashcans) is the door to the closet.


 This picture is from the bedroom looking into the bathroom.  The tub will sit straight ahead in front of the window.  The vanity will be to the right and the toilet and shower is to the left.


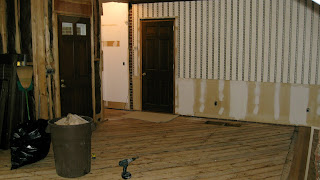
This is a picture from the kitchen down the newly created hallway. To the right is our bedroom and to the left is the pantry. This window is what all our windows used to look like. See the previous picture for a good shot of our beautiful new windows.


 This shot is standing in the bedroom and looking into the closet.


This shot is standing at the window in the bedroom and looking back through the bedroom.  The door opens into the hallway and the door across the hallway is the pantry.


This is the door that used to connect one bedroom, which we currently use as our office, to the back living area.  We, of course, didn't want the two bedrooms to connect, so we took out the door and will have to patch the space where the door used to be.

So, in a nutshell that is where we are on our master suite renovation.  Drywall will be put up tomorrow and then you will really get a feel of what it is going to look like.  We may also try to go tomorrow to pick out the tile for the bathroom floor, which I think will be the next project.

And, just because we think he is precious, enjoy this photo of Reggie on Halloween...

Thursday, June 3, 2010

The Yard Reveal

It is time to finally reveal our big yard makeover.  To fully appreciate the new yard, you need to be reminded of what it used to look like.  Let's go way back to what the house looked like when we moved in.


Not too bad, but kind of boring. One of the first projects we undertook was removing all the boxwoods and hollies from in front of our house and replacing them with a softer look.  Here's a more recent picture of our yard from this past winter.  As you can see it was pretty sad in in the winter with nothing in bloom.


And now, what our yard looks like now complete with sod, a new walk way and several new plants (there are a lot of pictures).


We hope you enjoyed our yard makeover project, and the pictures from all angles. We know there were a lot, but we wanted to try to give you the full effect.  Luckily it has actually been raining quite a lot - almost every day, so that is helping to keep down the amount of watering we have to do.

We have moved back inside and started to make some progress on the master bedroom renvotation, so we will update you on that again soon! 

Wednesday, May 26, 2010

We Passed!

We completed the installation of the plumbing and HVAC in the floor of the room, and we had our partial inspection today.  We passed our inspection, so now we can move forward with laying the floor and framing up walls.

In yard news, we will soon post pictures of our new and beautiful yard.  We thought we would wait a little longer to post pictures, and give the grass some time to look really good.  We will also be planting a few additional plants this weekend, so we will wait for pictures so you can see the full transformation.  Kevin also got a few landscaping lights for his birthday, so our yard can look great at night too.  However, I am not so sure a picture will capture that well, so you will just have to come visit at night!

Wednesday, May 12, 2010

We're Back!!

We have taken quite the hiatus from blogging and the renovation.  Last we wrote, we were hoping to move forward on the plumbing before Easter. Well, it's been a busy couple of months between me finishing my semester, quitting my job and starting a new job, getting a new nephew and Kevin working alot (all things we are very grateful for)! But, we are back at it.  Before starting on what we have done lately with the renovation, we have had many people ask us what we did with all those bricks we removed.  Well, here is the answer...

That is our wall of bricks in our garage (about 900!).

Now, on to what we have been doing.  We dropped off our claw foot tub to be reglazed, and we dropped off our buffet turned double vanity with Kevin's dad to get a new top.  The top was a little beat up, and the buffet was a little too high for a vanity.  So, by taking off the existing top and replacing it with a new one, we are able to remove some of the height and have a nicer looking top.

We hit a bit of a stand still waiting to put in the plumbing and the HVAC.  But, the plumber came last week to install the plumbing, and hopefully, the HVAC will be installed soon.  Typically these two things are installed through the ceiling of the floor below, but because we have a finished basement we did not want to have to rip out the ceiling.  So, Kevin cut holes in the floor to install the plumbing and HVAC.  By doing this, we have to have a partial inspection before we can lay our flooring.


Our new windows came in, and although, they are not exactly what we ordered, they are close enough.  I am just glad it was not a horror story like one of our friends experienced when ordering windows for her house.  I am convinced no window companies send you what you order.  It is unbelievable.

Because the weather has been so nice, we have used this time away from the master suite renovation to work in our yard.  I'll have more on that soon, but here is a sneak peak of what it is to come...


We will have more on the yard renovation in the next couple of days because it is going to look too good not to share pictures!

Monday, March 29, 2010

Just Another Brick in the Wall

We have spent the last few weeks taking down a brick wall.  Our back room was a 1950s addition to our 1930s cottage, and when they built the addition, they just added it on to the back brick wall.  We knew when we took down the drywall that there would be a wall of bricks, and we debated whether to keep the brick wall or take it down. 


Here's the before picture with the drywall still up.


There's the brick wall that Kevin removed brick by brick.

Once we decided that we definitely didn't want an exposed brick wall in our bedroom, we had to decide if wanted to drywall over the brick like had already been done or if we wanted to remove the brick and save it for future projects.  Because we would one day like to build a retaining wall along our driveway, we decided we would remove the brick wall and save the bricks.  This way we can one day have a retaining wall that matches the bricks on our house.  So after about two weeks of removing and cleaning bricks, we finally have a brick free wall, and we can now continue on with our actual renovation.


Here's the wall without the bricks.

And, just for fun, here's a picture of the dust filled room as the bricks were coming down.  You will notice the piles of bricks that all had to be moved to the garage!!

We are so glad to be done with those bricks because of that dust!

In other renovation news...

We also took out the hardwood floors in the breakfast nook area, so we are down to the sub-sub floor everywhere and ready to lay the plywood once we get the air conditioning and plumbing put in.  We also ordered our windows.  We got double-paned, wood windows, and hopefully they will be here soon.

This week we plan to have out the plumber, so he can work on a plan, and we will be ready to move forward after Easter. 

Sunday, March 14, 2010

The Demo Continues...

Although much has transpired with our makeover project, it has been a while since our last post - mostly because of me starting back to school this week.  The time has been limited as I have been trying to get back into the swing of things.  So, get cozy for a lengthy post to catch you up!

Last weekend we took down all the wood paneling, pulled out the built-in bookcases, and removed all the trim.  We also removed all the wood plantation shutters and plan to put them up on craigslist.com if you know of anyone who needs some wood shutters.

This project was definitely time consuming and took some strength!  Kevin tackled the built-in bookcases, while I started on the walls.  First thing I learned - start at the bottom and work up.  First I took off all the shoe molding, then I removed all the baseboards and took all the trim off around the windows and the doors. Kevin also took off all the crown molding, which we plan to save, paint and reuse because it is in good condition.  That was definitely a job for the contractor of the family because once my pieces came off, they weren't really in saving and reusing condition. Once, all those pieces were removed, it was time to pull off the wood paneling!

There I am with my crow bar pulling down all the paneling.  See how far I have gotten!  Check out that pile of trash behind me.  For the most part, all of the wood came down very easily.  Look how much brighter it is in there already.


Once all the paneling was down, it was time to pull out the framing for the closet and remove some of the framing where the wall was built out for the bookcases.  The framing around the closet proved to be a little too much for me - power tools were needed.  So, Kevin tore that out.


See how that wall juts out past the corner?  That little section needed to be pulled out.  So, we hammered away on it until it broke loose.


Next, remember how we pulled up the carpet to find partical board, not plywood, well, all the partical board had to be pulled up, which apparently was quite a task.  Each board did not easily pull up,but instead, disintegrated.  Let that be a lesson that you should not use partical board under your floors - very bad idea.  The funny thing is that the partical board is more expensive than the plywood at Home Depot.  The only thing I can think is that they thought it is more expensive therefore it must be better. 


So, we are down to the studs and the original subfloors.  You will notice that we still need to take the drywall off that one wall, but other than that, we are ready for the next step of the process, which involves bringing in the professionals who can do our HVAC and plumbing. 


The airconditioning guy came yesterday morning to work out a plan for the placement of the air ducts, and we measured out all the rooms to make sure everything worked out in the actual room.  I know there were a lot of pictures, but we accomplished a lot.  This week we plan to take down the dry wall and cut holes in the floor where the airconditioning can go.